


Unboxing and Setting Up Your Not a Wheelchair Kid Rig
Published on 04/29/2024
Welcome back to another Utah trikes article. This article is all about the Kid Rig. We manufacture and ship them here at our location in Springville, Utah and we wanted to give our new customers a guide for getting their Kid Rig setup and ready to ride once the big box shows up. So let us get started from the very beginning.
Part 1: Receiving and Unboxing
Once you order your Kid Rig and it’s paid for, it should ship the same or next day. Once our carrier has picked it up, the boxed up quad should show up to your door within 5 to 10 days depending on how far away you live.
When you receive the box, please inspect the packaging for any damages. Then, open up the box and inspect the contents, making sure nothing has been shifted or damaged in shipping. If there is damage please let us know so that we can figure out a warranty claim for you so that we can get any damaged pieces repaired or replaced.
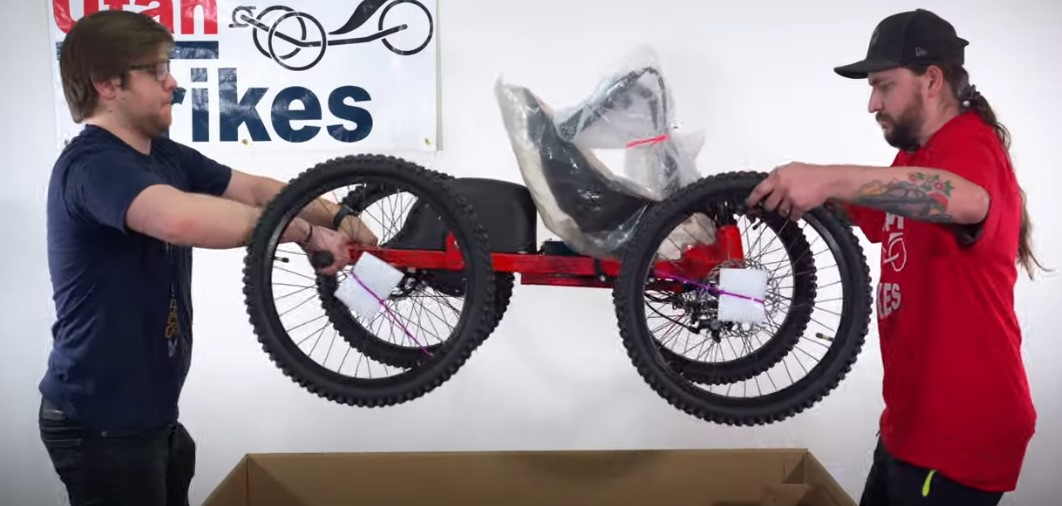
If everything looks good, go ahead and lift the quad out of the box. It helps to have someone to help you as they can be a little awkward to lift by yourself.
Then, check the cubby placed at the front of the box. Inside should be a small cardboard box containing your charger and your front bumper.

Now that everything is out of the box, you will notice the colored zip ties used to hold on the packaging. Only cut the brightly COLORED zip ties when removing the packaging. The black zip ties hold important wiring components to the frame of the quad.
Go ahead and remove all of the packaging from the quad and bumper.
Once the packaging has been removed, take a look at the front of the quad.
Here is the quick disconnect system for the bumper. Remove the clevis pin by pulling the lock out and over. Then slide the pin out of its slot.
Now grab your bumper. You will notice the two bolt heads on the attachment system match the two notches in the bumper. Place the end of the bumper into the channel at a 45 degree angle and slide it into the bolt heads until it can lay down straight.
Place the clevis pin back into its slot and lock it back down. The bumper should be nice and secure now.
The next step is to set everything up for your rider.
Part 2: Setup and Adjustment

First, we’ll readjust the handlebars using a 5mm allen wrench to loosen the two bolts on each of the handlebars. Once the bolts are loose, you can rotate the bars in and out depending on the reach of your rider. When you find the right position, tighten down the two bolts nice and tight so the bars don’t loosen up while riding.
The next adjustment will be the seat. There are 3 5mm allen bolts on each of the bottom seat brackets that when loosened will allow you to slide the seat back and forth to adjust for the height of your rider.
You can also move the top bolts on each of the brackets to their lower position to lean the seat back for more comfort.
Next step in the setup will be to gently remove the motor cover to find the wiring for the motor and battery. The cover is held on with hook and loop tape and should be easy to remove by gently applying pressure upwards from the rear.
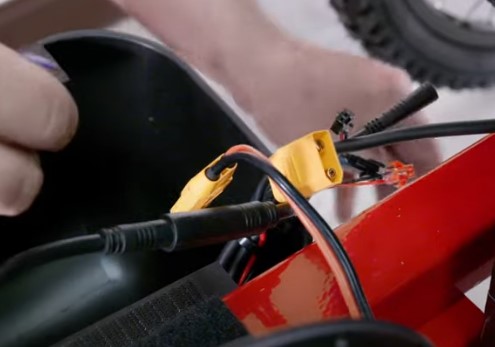
Find the two taped yellow connectors. These connections are for the battery and are disconnected and taped to prevent any problems in shipping. Remove the tape and connect both sides together. They will only go together one way.
Now, along the wiring loom you will find two black connectors, one with a red and black wire and the other with a blue and black wire. These are the wires for your reverse functionality.
We allow you the option to choose whether or not to enable this functionality for one main reason: If you use the reverse function while moving forward, you may damage the motor.
The best way to use this function is to make a complete stop, hold down the green button, and slowly apply the throttle. Then come to a complete stop again, remove your finger from the green button, and apply throttle to move forward.
If you believe your rider is capable of remembering these steps, go ahead and connect the two ends together to enable the reverse functionality
Once you’re done there, go ahead and line up the motor cover with the motor mount and press it back down onto the hook and loop tape making sure none of the wires get caught.
Part 3: Safety Warnings
So before we get to general usage, we have a couple of safety items that we’d like to address.
As a parent or guardian, you take full responsibility for the safety of your child or grandchild. We want to emphasize that wearing a helmet is always a good idea when operating this quad. These are not too extreme when it comes to speed or handling, but in the case something does happen, having a helmet really helps.
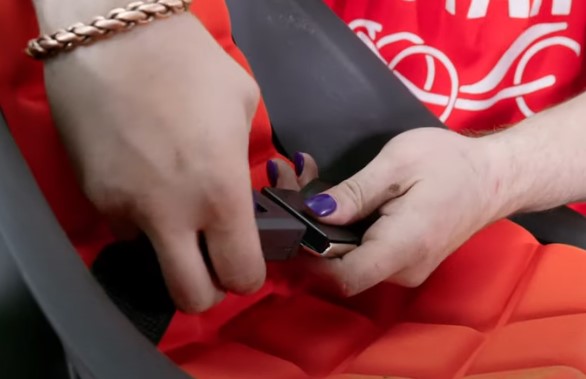
The seats come with seat belts to help keep your rider strapped down and prevent them from getting bucked out of the seat on bumps. We also provide foot straps on the front to strap down feet in case you need that.
We also like to warn about the importance of preventing injury by not placing hands or objects in wheels or rotating assemblies. We highly recommend the motor cover be on when riding as well to prevent anything from getting caught in the motor or chain.
The final thing is that there should only be one rider on the quad at a time. The weight limit of these quads are approximately 100 pounds, but there is some leniency to that. There is just no safe way to have more than one rider on the quad at a time.
Part 4: General Use
Okay now that we have all of the safety notes out of the way, let's get to how to start and operate your quad.
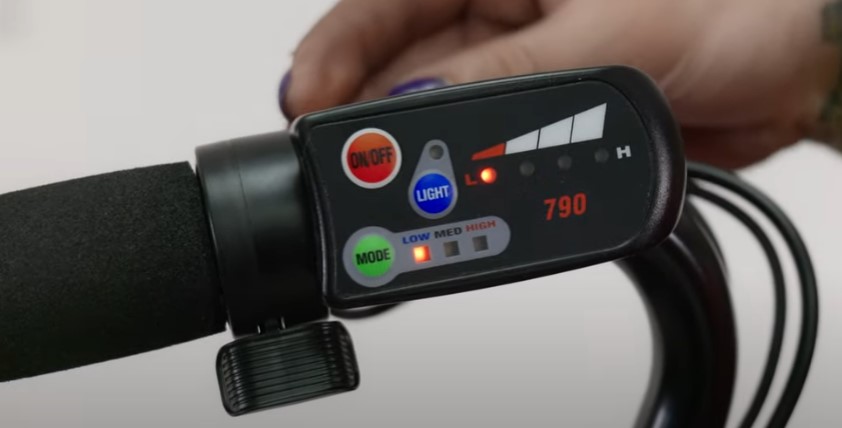
The console features a really simple setup. The big red button is used to turn on and off the motor and console. There are 4 red lights on the right that indicate the power left in the battery.
The green button on the bottom changes the mode or level of power that the motor will allow.
We recommend you start your rider off in the lowest mode and have them get used to the throttle and more importantly the brakes. After a little riding around you can then bump them up to whatever level they feel comfortable with.
This is just a recommendation. In the end, you know how capable your rider is.
Next to the console is the throttle. Just like some atvs the thumb throttle applies power based on how far it is pushed in.
On the quad there are brake handles on each handlebar. They correspond to the left and right brake on the front wheels, so remember to apply even pressure to both levers when braking so that the quad does not pull to one side or the other.
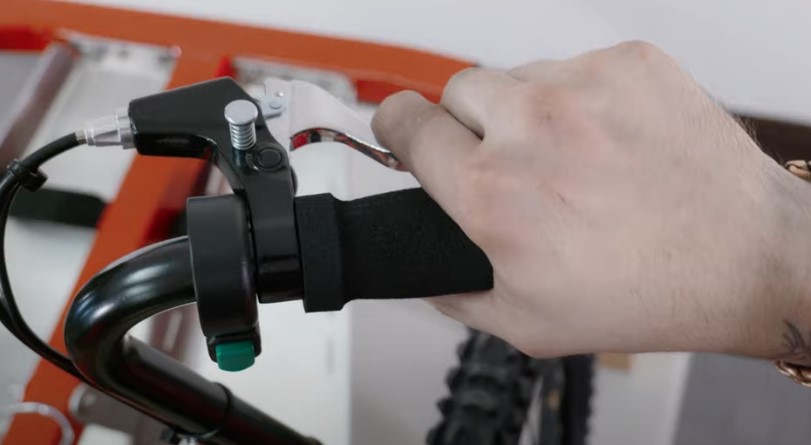
The brake levers also include a parking lock to lock the brakes. Just pull the brake lever, push down the pin, and release the lever. To unlock them, you just need to pull the lever.
The brake lines have sensors built into them. So when the brakes are applied, the motor will cut power. This is just an added safety feature so that when the rider needs to brake the motor wont keep pushing forward.
The charging port for the battery will be located somewhere underneath the seat and motor cover. It is a normal single connection and is directly connected to the battery. It is perfectly fine to leave the battery attached to the quad when charging.
A full charge from completely empty can take about 6 to 8 hours to get the battery back up to full and should get about 20 miles of range out of a full charge.
I hope that this has helped you get your new quad all set up and ready to ride if you have already ordered one. If you are interested in getting one for your little rider or if you have any questions give us a call or email us at trikes@utahtrikes.com and we’ll help you get set up with a new Kid Rig.